Master Controller Initialization with and without the MID/ Keypad /LCD

Master Controller Initialization with and without the MID/ Keypad /LCD

Administrator
|
 Master Controller Initialization with and without the MID/ Keypad /LCD There are two types of MC that you would need to initialize;
In both cases, start with programming it with the latest Firmware. If the MC has been configured previously, the FRAM would need to be cleared using the following process; Erase the FRAM (setup) / Erase FRAM Use Switch S1
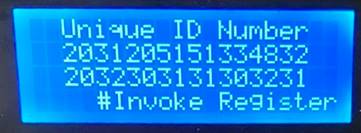
This would erase the FRAM. The Debug Console Message that indicates that the MC is clear 16:52:00.495 -> MQTT -> Subscribing to Topic = initialise Else there is a SITEID # The Unique ID# (16 Bytes) Each MC has a 16 byte unique ID#. If the LCD is present, it will appear on the LCD on start up. Alternately you can find it using the Debug Console. 20:42:49.278 -> ** F-RAM Device IDs Once the ID# is retrieved, the SiteRegistration Table must configure and a SiteID (3 Byte) assigned.
Policy would need to be devised on how these number are assigned Important Instruction in setting up the Event_Manager Table The next action would be to setup the Event_Manager Table with the configuration that you need loaded. The records in this table must not be re-used by just assigning a new SiteID. Once an MC is configured, the records must be deleted and when setting up a new MC, copy over setup records from the Event_Manager_Repository Table with new updated UniqueIDs. NB The StateID =3 (pending) once a successful update is done, it will change to 4 (completed), if it is 5 (Failed), there could be a server or connection problem.
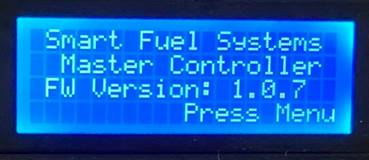
The SequenceNo 0-4 present the configuration sequence that defines MapVersion 01. This must be done is this order. The reset of the entries (SequenceNo >5) can be done in any order at any interval and do not need to be done for the initial configuration. This means that the MC can later configured for the specifics that would apply to the application that is it schedule for. Functional Templates can be designed to speed up this configure process for different uses and Technicians will understand the setup re: Pump/ATG ID# etc. Method1 with MID/LCD/KEYPAD Once the MC starts up, this is what will be visible on the LCD.
Once the Menu button is pressed (ESC – on the Davo Metal keypad) The Enter the password “1221” Caution: If the password is not asked for a second time, then the MC configuration is not Cleared, go back to the step on “Erase the Fram” After entering the Password, a second time, the UniqueID will be displayed and the # must be pressed to start the registration process. The purpose of ID# on the LCD, was that the Technician could sent a picture to the HelpDesk to assist in the config process.
(NB: The “.” Will be used instead on the Davo Metal keypad) Once ‘#’ is hit, the registration starts and there will be a delay after the first interaction as the MC is assigned a SiteID - “topic”. Thereafter the updates occur in rapid succession. Method2 (No MID) This method poses the challenge – how to get the 16 Byte UniqueID of the MC ? The Debug Console can still be used or the process can be started and the MC will send the ID# to the MessageupTable with a zero for the SiteID#
Check that you have the right record for the datetime in question. The Process to Register the MC with using Switches (Application – Generator Project) Its important to keep in mind that the FRAM would need to be cleared if this MC was previously used; Erase the FRAM (setup) / Erase FRAM Use Switch S1
If this MC was never used before, proceed to this step; Use Switch S1
The Debug Messages that indicate the process has started. 16:52:00.495 -> MECH -> SHOW MSG: MC Version & Connecting sequence |


| Free forum by Nabble | Edit this page |